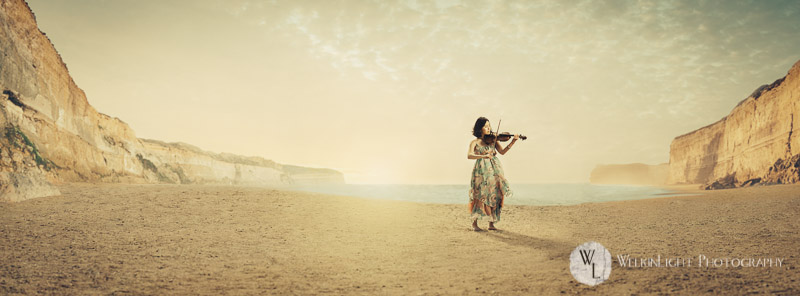
Today’s blog is to be a bit nerdy, and a bit removed from what I normally write here. I was asked by my good friend, Flash Parker, to do a rundown on how this image was put together. Bare in mind that I’m not Aaron Nace or Scott Kelby, I don’t profess to be doing this in the most correct or fastest way. The image came together from a thought and working on it digitally until I got it to where I wanted it. In this first blog, we will cover the images that were shot on the beach at Jebu Island, and in part 2 we will cover the compositing and editing process. Let’s take a look at the final image before we begin to get an idea of where we’re headed.
This has been one of the most involved images I have ever produced. Many hours of planning went into this. Not to mention 3 hours of public transport to get to the location. I mentioned all of the location and light issues we had in my previous post, but needless to say the conditions were not ideal. We arrived at the location and Yvonne got the make up underway. Wesley and I went down to the beach to discover that things were not quite what they used to be. Nevertheless, I would have to make photographs – and after that long and gruelling morning on an old bus winding (and bouncing) through the Korean countryside, they had better be good or I wouldn’t be very popular at the end of the day. The area was crowded with people, the sand was filthy and filled with rocks, and by the time we’d finished make up we had around 45 minutes or so to shoot. I had redefined my goals for the shoot, and thrown all simplicity out the window. Compositing it was going to be.
I wanted an otherworldly feeling for this image, almost like a place that shouldn’t exist. The light was to be soft and beautiful, the colours warm, and the scene empty. This was so far from what we had that I decided to shoot what I would need to build such a scene. I took enough photos to have an area of beach around Nahrae that I could use to blend with other images easily. There would be nothing I could do about the harsh shadows on the ground, so I exposed everything as bright as possible without blowing out. This would mean I’d still have detail in the shadows and could fill them in a little in post. Below is that sequence of shots, and the resulting stitch using Photoshop’s photomerge feature. I did this directly from Lightroom by selecting the images in the filmstrip, and choosing Photo->Edit in->Merge to panorama in Photoshop from the menu. This way the final product would automatically be imported back into Lightroom, where I would do the final editing.
Photomerge is reasonably good on it’s default settings for most intents and purposes, so I left it on that. Once the merge was done, the next thing to do was to reopen the image of Nahrae, and blend that image back into the background. The reason for this is that photomerge on its default setting distorts images to make them fit together better. I didn’t mind distorting the background in this case, but I would prefer that my subject remained in her original proportions. I’m sure she appreciated that as well. To bring her back in, I used a simple layer mask and some cloning to make edges match up.
From here it was a case of cleaning up the image. In some cases removing people from the background, in others cleaning up mistakes in the stitching process. All the heavy lifting went in here, although I did do some additional cloning right at the end of the editing process. I find that a Wacom tablet is the best way to clone and clean things up in Photoshop. It’s a much more natural way to interact with your images and feels a lot more like using on of those grey lead pencils with the red eraser on top like we used to at school. Much more natural for me. I use the pressure sensitivity to alter the size of my brush, which gives me a similar feeling to actually drawing on paper.
At this stage, we have a merged image that has had some basic cleanup work done. But you can see a difference in the light surrounding the subject, the sky is still hazy and ugly, and we’re far from that dream world I wanted to create. In the next installment on this image, we’ll go into adding the cliffs and sky, then finalising the colour in Photoshop and Lightroom.


Good stuff mate. Ill be waiting for the next post.
Thanks for sharing!! Amazing work!!
[…] ago I began a new series of photographs of musicians when I photographed Jazzmin and Nahrae as a violinist and a cellist at Jebu Island off the west coast of Korea. I have been wanting to continue this series for a while […]